Как сделать торгового робота для Binance
В настоящее время я увлекаюсь написанием торговых роботов. Постепенно изучаю нейросети для их применения к анализу цен/объемов акций/фьючерсов.
Обычно я писал торговых роботов для работы с Брокерами и делал авто-торговлю Акциями или Фьючерсами, но вдруг возникла мысль.
— А что, если уже готовый код можно применять и на других активах? Например на крипто активах для Биткоина или Эфира или других?
Уже изучив много библиотек и примеров за долгое время написания своих торговых роботов, решил сделать небольшую библиотеку backtrader_binance для интеграции API Binance и библиотеки тестирования торговых стратегий Backtrader.
Вот с помощью backtrader_binance, сейчас и создадим алго-робота для торговли BTC и ETH.
- Устанавливаем последнюю версию Python 3.11
- Устанавливаем среду разработки PyCharm Community 2023.1
- Запускаем PyCharm Community
- В нём создаем новый проект, давайте его назовём algo_trade_robot и укажем что создаем виртуальное окружение Virtualenv, с Python 3.11 => нажимаем «Create».
После того, как проект создался и в нём создалось виртуальное окружение, мы стали готовы к установке необходимых библиотек))) Кликаем внизу слева на «Terminal» для открытия терминала, в котором как раз и будем вводить команды установки библиотек.
Устанавливаем необходимые библиотеки
Для установки библиотеки осуществляющей интеграцию Binance API с Backtrader вводим команду
pip install backtrader_binance
Теперь необходимо установить библиотеку тестирования торговых стратегий Backtrader
pip install git+https://github.com/wiseplat/backtrader.git
P. S. Пожалуйста, используйте Backtrader из моего репозитория (так как вы можете размещать в нем свои коммиты) .
И наконец у нас есть некоторые зависимости, которые вам нужно так же установить
pip install python-binance pandas matplotlib
Теперь нужно сделать копию всего репозитория в корень проекта, чтобы из него взять примеры кода торговых стратегий, делается это одной командой, так же через терминал.
git clone https://github.com/wiseplat/backtrader_binance
И теперь наш проект выглядит вот так
Чтобы было легче разобраться как всё работает, я сделал для вас множество примеров в папках DataExamplesBinance_ru и StrategyExamplesBinance_ru.
Перед запуском примера, необходимо получить свой API ключ и Secret ключ, и прописать их в файле ConfigBinance\Config. py:
# content of ConfigBinance\Config. py
classConfig:
BINANCE_API_KEY = «YOUR_API_KEY»
BINANCE_API_SECRET = «YOUR_SECRET_KEY»
- Зарегистрируйте свой аккаунт на Binance
- Перейдите в раздел «Управление API»
- Затем нажмите кнопку «Создать API» и выберите «Сгенерированный системой».
- В разделе «Ограничения API» включите «Включить спотовую и маржинальную торговлю».
- Скопируйте и вставьте в файл ConfigBinance\Config.py полученные «Ключ API» и «Секретный ключ»
Теперь можно запускать примеры из папок DataExamplesBinance_ru и StrategyExamplesBinance_ru.
Для создания торгового робота обычно придерживаются некоторой структуры кода, можно сказать шаблона, по которому код работает с торговой стратегией и с данными с рынка по тикеру/тикерам и после отработки выводится некоторый результат.
В примерах вы найдете несколько вариантов запуска стратегий, а вот примерно стандартная структура кода для торгового робота, файл «07 — Offline Backtest Indicators.py»:
Посмотрев на код выше, можно легко увидеть, что
- импорт необходимых библиотек осуществляется строками 1..4
класс Индикатора 11..17 строки, обычно выносят в отдельный файл
класс Стратегии/Торговой системы 21..138, обычно выносят в отдельный файл
- — основной раздел — строка 141
- подключение по API к бирже — строки 151..155
- задание параметров запуска стратегии 172..180
- запуск стратегии — строка 182
- получение данных по тикеру/тикерам по API строки 172..175
- обработка этих данных стратегией — строки 61..115
- выставление заявок на покупку/продажу — строки 105 — покупка и 114 — продажа
- возврат результатов из стратегии — строки 183, 187, 188
- вывод результатов — строки 183, 187, 188
Класс торговой системы имеет несколько основных методов:
- init — итак понятно — здесь инициализируем вспомогательные переменные и индикаторы для потоков данных
- next — вызывается каждый раз при приходе нового бара по тикеру
- notify_order — вызывается, когда происходит покупка или продажа
- notify_trade — вызывается когда меняется статус позиции
Вы можете по желанию расширять/добавлять новые методы/функционал.
Поэтому я записал специально для вас видео по созданию этой стратегии по шагам:
Если возникают какие мысли по созданию, пишите посмотрим.
Параметры стратегии не были оптимизированы, поэтому она может дать более лучший результат.
Т.е. 2000 USDT превратилось в 5515 USDT => прирост 175%
Как мне видится, получилось довольно интересно 🙂 И жду ваших коммитов / фиксов / идей!
Как создать бота для торговли на бирже Binance

В данной статье мы расскажем вам о том, как создать и настроить вашего первого бота. Данная инструкция поможет вам лучше разобраться в интерфейсе и параметрах настройки. Итак, приступим:
Регистрируемся и логинимся в https://revenuebot.io/, переходим во вкладку «Bots» (https://app.revenuebot.io/office/#/bots/)
Раскрываем меню «CREATE NEW BOT»…
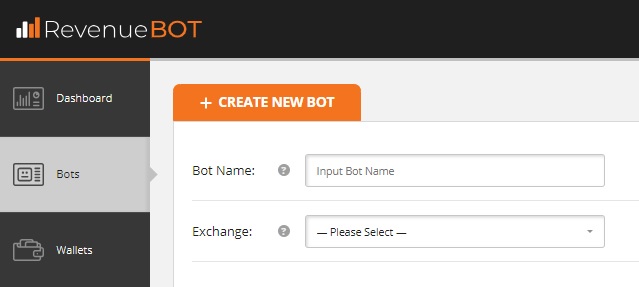
Идентификация, API и кошелек бота
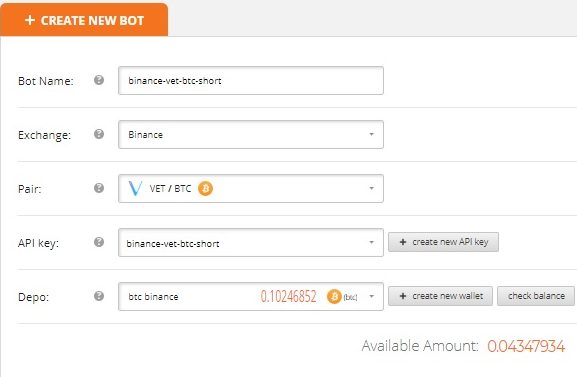
Bot name: Название бота (чаще всего в названии используются характеристики: биржа, торговая пара криптомонет, алгоритм работы и тп.)
Exchange: Выбираем биржу в выпадающем списке (рассмотрим на примере Binance)
Как только вы выберете биржу вам станут доступны следующие поля для заполнения:
Pair: Выбрать торгуемую пару криптомонет. О том, как выбрать эффективную торговую пару подробно написано тут — «Как подобрать эффективную торговую пару криптомонет»
API key: Выбрать API ключ из ранее созданных, либо создать новый.
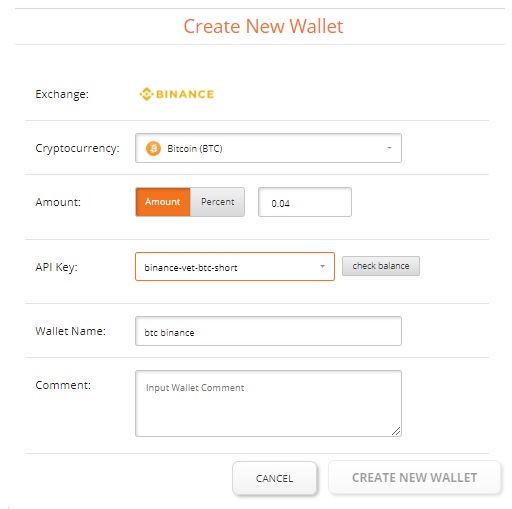
Depo: Выбрать виртуальный кошелек из ранее созданных, либо создать новый, где ввести:
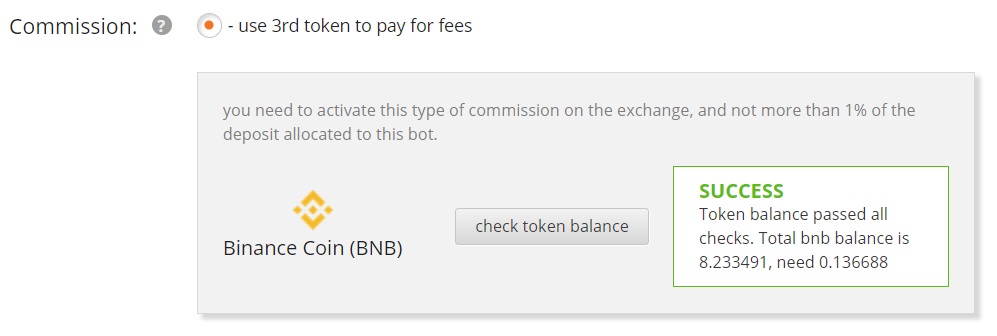
Commission: Выбрать вариант комиссии, которая будет применятся биржей. Данная настройка актуальна только для биржи Binance, так как на ней возможна оплата комиссии в третьем токене, который не участвует непосредственно в текущей торговле (BNB токен).
Для использования такого вида комиссии, необходимо активировать ее в аккаунте биржи Binance. Рекомендуем всегда использовать этот вид оплаты комиссии торговли на бирже Binance, так как это дешевле.
Необходимо лишь следить, чтобы BNB был на аккаунте. Для этого наш бот проверяет баланс BNB токена перед каждым пуском. Если баланс токена меньше необходимого, то бот не запускается в работу и отправляет нотификацию пользователю с информацией о необходимости пополнить баланс BNB токена для начала торговли.
Алгоритмы работы бота и его настройки
Algo: Выбрать алгоритм работы бота.
Бот использует API интерфейс бирж для выставления ордеров по выбранному алгоритму и отслеживания их выполнения.
На данный момент существует два алгоритма работы бота RevenueBot:
После выбора алгоритма работы бота, пользователю предлагается воспользоваться шаблонами настройки данного алгоритма: Light trade mode, Normal trade mode, Extreme trade mode.

Все поля настроек заполнятся автоматически при выборе любого из предложенных шаблонов.
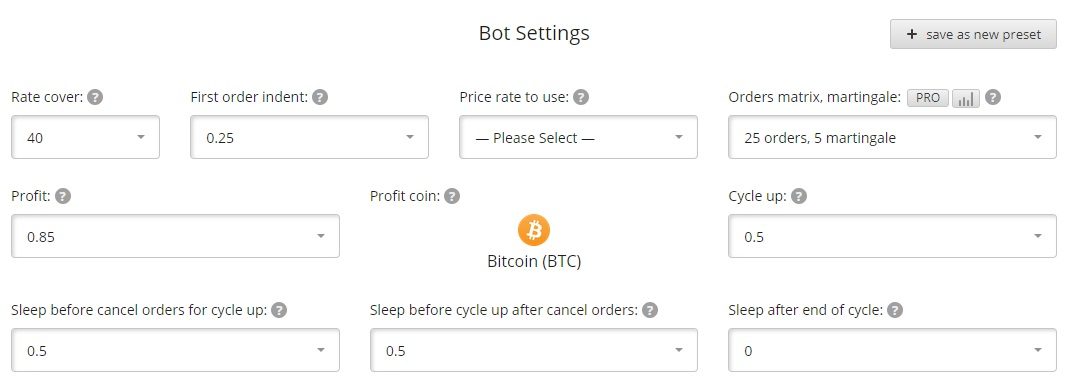
Rate cover: Процент перекрытия изменения цены для расчета сетки ордеров. Данная настройка определяет в процентах отступ последнего ордера в сетке ордеров.
First order indent: Отступ в процентах первого ордера в сетке ордеров.
Price rate to use: Выбор рейта на бирже, от которого вести расчет сетки ордеров. Это могут быть рейты buy, sell, average.
Orders matrix, martingale: Сетка ордеров и мартингейл.
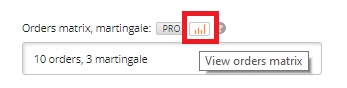
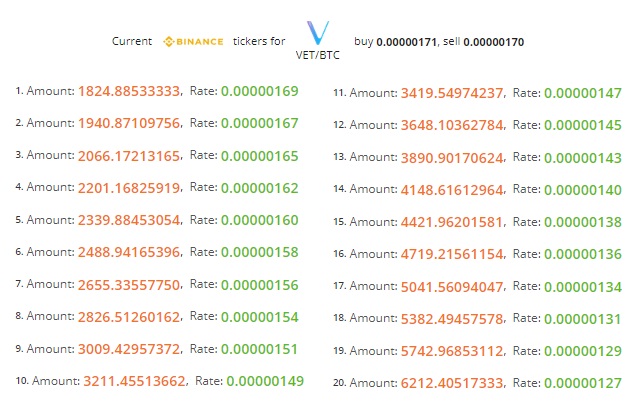
Тут задается количество ордеров в сетке и мартингейл (на сколько процентов каждый следующий ордер в сетке будет весомее предыдущего). Кликнув на view orders matrix, Вы сможете увидеть рассчитанную сетку ордеров.
Profit: Тут задаем в процентах профит, который будет заложен ботом при расчете цены завершающего цикл ордера.
Profit coin: Данная настройка доступна только для алгоритма short. Задает в какой из торгуемых монет будет профит.
Cycle up: Бывает, что бот выставил сетку ордеров, а цена ушла в другую сторону. Получается, что нужно ждать пока цена не вернется, а ждать можно долго.
Этого ожидания можно избежать, настроив актуализацию сетки ордеров к текущей цене. Тут задается процент, при достижении которого, текущая сетка ордеров отменяется и выставляется новая.
Sleep before cancel orders for cycle up: Тут задается задержка в минутах, перед тем как начать отменять текущую сетку ордеров, когда срабатывает настройка Cycle up.
Данная настройка позволяет избежать частых отмен текущей сетки ордеров, когда цена за очень короткое время изменилась и вернулась к прежнему уровню.
Можно выждать некоторое время, чтобы зря не снимать текущую сетку ордеров.
Sleep before cycle up after cancel orders: Тут задается задержка в минутах перед выставлением новой сетки после отмены предыдущей сетки ордеров.
Данная настройка также позволяет избежать негативных последствий в ситуации, когда цена за очень короткое время изменилась и вернулась к прежнему уровню.
Sleep after end of cycle: Тут задается задержка в минутах перед тем как начать новый цикл после завершения текущего цикла.
Так же можно задать каждую из этих настроек самостоятельно и сохранить свой шаблон.
Дополнительные настройки
add revenue to depo: При получении прибыли можно добавлять ее к депозиту который использует бот, таким образом увеличивая депозит.
При включенной настройке весь профит от работы бота зачисляется на виртуальный кошелек, который использует данный бот.
logarithmic scale for orders: Обычно сетка ордеров рассчитывается так, что все ордеры в ней расположены линейно, на одинаковом расстоянии друг от друга по всему перекрытию цены.
При небольших колебаниях цены будут чаще всего выполняться первые, самые маленькие по объему, ордеры в сетке.
Чтобы вовлечь побольше депозита в торговлю при небольших колебаниях цены, можно использовать логарифмическое распределение, которое позволит повысить плотность ордеров вблизи текущей цены и понизить плотность ордеров при удалении от текущей цены.
Плотность ордеров можно настроить для разных ситуаций по разному с помощью коэффициента logarithmic factor увеличивая или уменьшая его.
Для большинства случаев подойдет значение logarithmic factor = 1.5.
Кликнув на «view orders matrix», Вы сможете увидеть рассчитанную сетку ордеров.
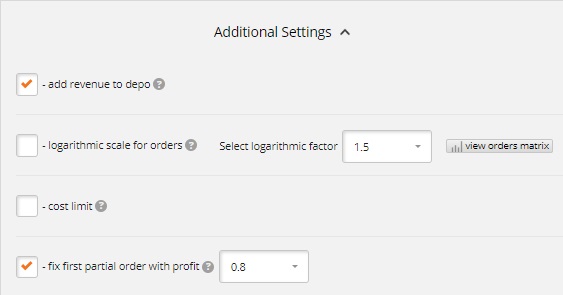
cost limit: Используйте эту настройку, чтобы не начать покупать слишком дорого и не начать продавать слишком дешево.
Задает максимальную цену, выше которой бот не начнет цикл для алгоритма Long и минимальную цену ниже которой бот не начнет цикл при алгоритме Short.
fix first partial order with profit: Бывает, что первый ордер в сетке частично выполнился, но цена пошла в другую сторону. Такое случается, когда бот оперирует большим депо и ордеры в сетке довольно объемные, даже самый первый.
В такой ситуации можно долго ждать возвращения цены и выполнения ордера полностью, чтобы работа алгоритма продолжилась. Включив данную настройку можно задать процент профита для расчета такой цены, при достижении которой мы получим профит, если отменим частично выполненный ордер и выставим на его сумму завершающий цикл ордер. Ведь цена ушла в ту сторону, где мы получим профит, просто ордер оказался слишком объемным.
Фильтры для старта бота
Мы рекомендуем всегда настраивать фильтры для старта бота. Они необходимы для того, чтобы бот начал торговлю в самое выгодное время, основываясь на выбранном алгоритме торговли и ваших предпочтениях. Подробнее читайте тут: «Фильтры для старта бота. Описание и настройка.»
Saved searches
Use saved searches to filter your results more quickly
You signed in with another tab or window. Reload to refresh your session. You signed out in another tab or window. Reload to refresh your session. You switched accounts on another tab or window. Reload to refresh your session.
A simple python crypto trading bot for the Binance Exchange.
idiydownunder/binance-trader-bot
Name already in use
- Local
- Codespaces
Use Git or checkout with SVN using the web URL.
Work fast with our official CLI. Learn more about the CLI.
Sign In Required
Please sign in to use Codespaces.
Launching GitHub Desktop
If nothing happens, download GitHub Desktop and try again.
Launching GitHub Desktop
If nothing happens, download GitHub Desktop and try again.
Launching Xcode
If nothing happens, download Xcode and try again.
Launching Visual Studio Code
Your codespace will open once ready.
There was a problem preparing your codespace, please try again.
Latest commit
Git stats
Files
Failed to load latest commit information.
README.md
Binance Trader Bot
Trade crypto like pro 24/7 whether you’re working, resting or playing.

This project came about as I wanted my crypto holdings to work harder for me than simply staking it. I looked around a little (not very much at all, if I’m honest) and couldn’t really find one that I liked. I really didn’t like the way I’d have to set and watch prices for trading pairs or the way others only did one trading pair at a time, monthly subscriptions, etc, etc. I just wanted a bot that was simple to use and capable of multiple trading pairs.
As stated I wanted something that was simple and easy to use. With that in mind I went into developing this bot with two old sayings in mind, the first one being ‘keep it simple, stupid’, as I’m definitely no crypto trading god. The second being about making money ‘buy low, Sell high’ and that’s exactly how this thing works. The bot follows three SMA (Simple Moving Averages) points as well as the current price, to determine which way the market is moving, to figure out if it’s a good time to buy or sell. Simply put it ‘buys in the dips and sells at the tips’.
The trading strategy is very simple; buy low, sell high. This is achieved by calculating three different moving averages over three different time periods, just like in any trading graph you’ve ever seen. To determine which way the market is moving, either up or down. So if the medium average price is greater than the long average price and the short average price is greater than the medium average price and the current price is greater than the short average price, the bot will sell. The same is true for buying just replace the ‘greater then’ with ‘less than’ and the bot will buy.
WARNING: If any of these conditions are met the bot will trade regardless of the current price being the lowest or highest price possible. It simply makes the buy or sell choice based on trends in the market at that time.
- Hardware, some kind of computer to run the python script. It definitely doesn’t have to be a high end machine, in fact something like a Raspberry Pi is perfect for this, due to its low power consumption and physical size. It’s also what was used during the testing of the bot.
- An installation of Linux (or possibly Mac OS, not tested as yet), something Debian based, like Ubuntu or Raspberry Pi OS. It’s possible the bot may work with other versions of Linux, but it hasn’t been tested at the time of writing this. Sorry to Windows users as there seems to be a bug in the python-binance library used in the bot that causes errors.
- An internet connection, obviously as there is no way to communicate with the Binance exchange without it
- An account with the Binance exchange, with some funds available. Your account will also provide the necessary API keys to get the bot working with your account on the exchange.
After you have your chosen system up and running, you can run the following commands to install the bot.
- Update System
- Install Dependencies
- Clone Repository
- Change Directory
- Install pip Dependencies
After you have run the above commands you should be all set to run the bot, just remember you will need to edit the config.json file with the trading pairs you wish to use first. See configuration section below.
- The first time you run the bot you will be asked for your API key and secret key, See Getting API Keys section below.
The config.json is where you will need to add your data relating to which markets you wish to trade on, as well as defining certain things about the trading behavior on those markets. The bot will also monitor this file for changes and will apply the changes dynamically at run time, so you don’t need to close and restart the bot for setting changes to take place.
To get started you will need to load the config.json file into your favorite text editor, nano, vi, whatever you like.
NOTE: After editing config.json it needs to be a valid JSON file, If you are unfamiliar with editing JSON files I would highly recommend using an online JSON validation tool like JSON Lint to check your changes are valid.
This is what a basic default config.json file looks like;
tld If you are interacting with a regional version of Binance which has a different Top Level Domain then you will need to pass this when using the bot for it to work properly, for example if the website you login to is ‘binance.com’ you would set this to ‘com’ or if you use ‘binance.us’ you would set this to ‘us’.
sma_short_period, sma_medium_period & sma_long_period These values represent the number of days used when calculating the moving average price’s. I do not recommend changing these values unless you are a more advanced trader looking to adjust the trading strategy to better suit your trading strategy.
trade_timer_minutes This value sets, in minutes, how often the bot will check the markets looking for trades. Remember to be conservative when setting this value, for example if you set it to 1 minute the bot will attempt to make buy or sell trades every minute if the market conditions are right resulting in holdings being rapidly drained one way or the other. The other consideration when setting this value is the time period used in the timeframe variable within the bot python script, see Configuration (traderbot.py) for more information
show_balances, show_markets & show_trades These are boolean flags set to either true or false depending on if you want the data displayed in the terminal at run time.
«show_balances»:true = Will display the ‘free’ (not locked) amount of holdings in that wallet, zero balances are not shown.
«show_markets»:true = Will display the current market price as well as your trading status for that market.
«show_trades»:true = Will display a buy, sell or miss message about an order. All successful buy and sell orders are logged to a file regardless if this value is true or false.
sales_log_file & error_log_file These values are used to set the log file names and or paths the bot uses for reporting.
trading_pairs This is where we set up which trading pairs or markets we want the bot to trade on. E.g BTC/USDT or ETH/USDT. You can add as many as you want to trade on, but you will need at least one! Add or remove trading pairs in blocks like this;
coin Sets which cyrpto currency we wish to buy and sell.
fiat Sets what currency we are using to buy and sell the cyrpto currency with. This could also be another cyrpto currency.
coin_hold_amount & fiat_hold_amount Sets how much of a currency you wish to hold. These values are subtracted from your wallets free holding balance before determining if a buy or sell action is possible. Note if set to 0 the bot will use all available assets when making trades. Also note that this hold amount is only for this trading pair and not other Trading pairs.
trade_enable This value will enable or disable all trading in this market. It acts like a master switch and will override trade_buy_enable and trade_sell_enable without changing their values.
trade_price_guard By having this value set to true, the bot will monitor the buy pricing to find the highest buy price. Then when it comes time to sell again, the highest buy price will be added to the trade_sell_price_adjustment value, then if the current price is equal to or greater than this calculated value, the sale is made. Note this is a one time deal and after a successful sale the highest buy price is reset ready for the next buy period. Also use this with some caution as if a market continues to dip it may be a long time before the price goes high enough to trigger another sale.
trade_buy_enable & trade_sell_enable Setting these will either enable or disable buying or selling. As long as «trade_enable»: true these settings are in effect. Useful if you wish to liquidate or accrue certain currencies.
trade_buy_adjustment & trade_sell_adjustment Setting these values will determine the amount at which you buy and sell at. These work like a multiplier as Binance has a minimum trade amount. Because they work like a multiplier two numbers are reserved as they would mess with the calculations.
0 = Minimum Buy/Sell Amount
1 = All Available Balance
values > 1 = Minimum Buy/Sell Amount X Adjustment Value
values < 1 & values > 0 = All Available Balance X Adjustment Value (works like a percent of)
If the calculated adjusted value can not be used the minimum amount will be used instead.
trade_buy_price_adjustment & trade_sell_price_adjustment These values get +/- to the Long Moving Average to help reduce noise and small gains. For example if the MA was .5430 and the Current Price is .5432 it would not be a very profitable trade. By adding a small adjustment we can better see how far away the current price is from the moving average. The trick here is to have it set high enough to reduce noise when the price is close to the average as well as making good gains, but not so high that we never make any trades. If set to 0 the price will only need to be higher than the Short Moving Average to trigger a trade.
While configuring the traderbot.py is not mandatory and there is only one option, I would only recommend this for advanced traders, but I’ll cover it here anyway.
Open the traderbot.py file in your favorite text editor.
Then scroll down until you find the section that looks like this;
This section sets the KLINE Time Frame, to change this simply comment out the line timeframe = Client.KLINE_INTERVAL_4HOUR with a # at the start of the line and delete the # mark from the line for the Time Frame you wish to use.
WARNING: This option will have the biggest impact on the bots behavior. If you wish to change this option I highly recommend you do so before running the bot for the first time. Changing after trading for a while could very well see go from buying phase to a selling phase, just by changing this one option. I can not recommend strongly enough that if you do wish to change this option, to make that decision before trading with the bot and once set, forget about it, seriously.
IMPORTANT INFORMATION This option defines the ‘candle’ time period that you would see on a trading chart. As a result this will have a major impact on calculating the moving average prices, ultimately affecting the bots decision making process.
As a general rule setting this option to lower values like 15min or 30min would result in more trades being made with only small gains being made. Alternatively setting it higher values like 1day or 3day would result in less trades being made, but with bigger gains.
Other things to consider; more trades for smaller gains would incur more transaction fees. The trade_timer_minutes value in the config.json file as there would be no need to try and make trades every minute if your KLINE was set to 3days, generally you would only need to check once per KLINE period, to maybe 2 or 3 times per KLINE period depend on your capital and risk levels.
Getting API Keys
Head over to Binance and login or sign up.
Click on the profile icon.

- Select ‘API Management’ from the drop down menu.

- Select ‘Create API’.

- Ensure ‘System generated’ is selected and click ‘Next’.

- Enter a label (name) for the API Key, this can be anything.

You should now be faced with an anti robot verification check, complete that and move on.
You will need to complete a ‘Security verification’, Click both ‘Get Code’ buttons, enter them in the appropriate spaces and click ‘Submit’.

- We now need to edit the API Key to enable it to be able to trade, click ‘Edit restrictions’.

- Select ‘Restrict access to trusted IP’s only’.

- Enter your IP address and click ‘Confirm’. If you don’t know your IP address simply ask Google or use a service like WhatIsMyIP to find it.

- Now you can select ‘Enable Spot & Margin Trading’, then click ‘Save’.

- You will need to complete another ‘Security verification’, Click ‘Get Code’ buttons, enter it in spaces and click ‘Submit’.

- Now you can copy and paste your API Key and Secret Key into the config.json file.

NOTE: You must get the Secret Key at this point as it WILL NOT be shown again. If you fail to get it now you will need to delete the API Key and start over.
Before You Bother: The API Key shown here was deleted after compiling this section, it will not work!. The IP address shown here is not mine! I made it up for demo purposes!
This is great and all, but the bot stops as soon as I close my terminal and I don’t want to have it open 24/7, I hear you say. Relax, if you have been following along we actually installed a program called screen during the Installation section. Just in case you didn’t you can install it now with the following command.
The screen program creates terminal instances we can attach and detach to while keeping whatever program that’s running in it active. To start a new terminal instance with screen we use the following command syntax;
screen -S <instance name>
we can use the following command syntax to reconnect to an instance with;
screen -r <instance name>
And we can see a list of running instances with the syntax;
screen -ls
when we are connected to a running instance we can detach from it by pressing ctrl + a then press ctrl + d
Let’s start a screen instance for our bot with the following command;
Now navigate to the bot directory and run the bot just like before;
Let’s detach by pressing ctrl + a then pressing ctrl + d
Now check to see that we did detach properly;
Let’s check on our bot by reconnecting;
Persistence (System Startup)
To have this bot run every time the system is started or rebooted, I recommend making a cron job. To do this simply enter the following command in your terminal;
If this is your first time creating a cron job you will be asked to select a text editor, pick whichever you feel comfortable with. If you’re new just go with nano as directions from here will be with nano. Once the crontab opens in the chosen editor simply copy the following code and paste it in as the last line;
Just remember to change the /home/pi/binance-trader-bot/traderbot.py to the location of the bot on your system. Now press ctrl + x to exit, confirm the changes by pressing y and write the output by pressing ‘Enter’. Now the bot should start automatically every time the computer is restarted.
While developing things like this are a passion and hobby for me. I ask that if you have found this educational, helpful, insiteful or maybe you’ve even made a few dollars out of this bot, maybe you could consider making a donation to the project. To help fund future development costs, mainly my time and coffee.
Cash donations can be made through my PayPal.Me link.
Crypto donations can be made to the following wallets;
Bitcoin (BTC): 1Kt78m7LPZkkfxyMx8rVcdJxBftZw937Sc
Monero (XMR): 4BAco3fES2cXfymfx7NVd62Z6EfgXNvaZg3tba8jWjvHR52cHDbmkiT5iEm3Kxq4XhbCeFEacCJzkBYtHpXwwGbJ2d7FWwr
alt=»Creative Commons Licence» width=»» />
This work is licensed under a Creative Commons Attribution-NonCommercial-ShareAlike 4.0 International License.
Как написать пассивный доход: Пишем качественного трейд бота на JS (часть 1)
Начнем писать трейдинг бота, который будет работать на криптобирже Binance. Бот должен уметь:
торговать самостоятельно, принося какой-то доход
должен быть удобен для создания и обкатывания различных стратегий торговли
тестировать стратегию на исторических данных
Пожалуй, начнем с архитектуры
У нас есть биржа Binance, у которой есть шикарное api. Поэтому архитектура могла бы выглядеть так:
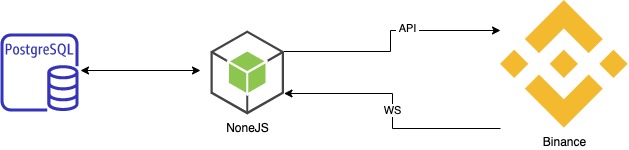
Вызвать пару методов “купи дешевле” и “продай дороже”. Но задача для нас написать такого бота, при котором условный программист-трейдер сможет создавать и тестировать на прибыльность новые стратегии. Поэтому, необходимо отделить логику торговли от всего прочего. А также модулю логики должно быть все равно к какой бирже его подключили: к реальному API или к псевдо-API (для тестирования). С учетом всего этого получилась примерно вот такая архитектура:
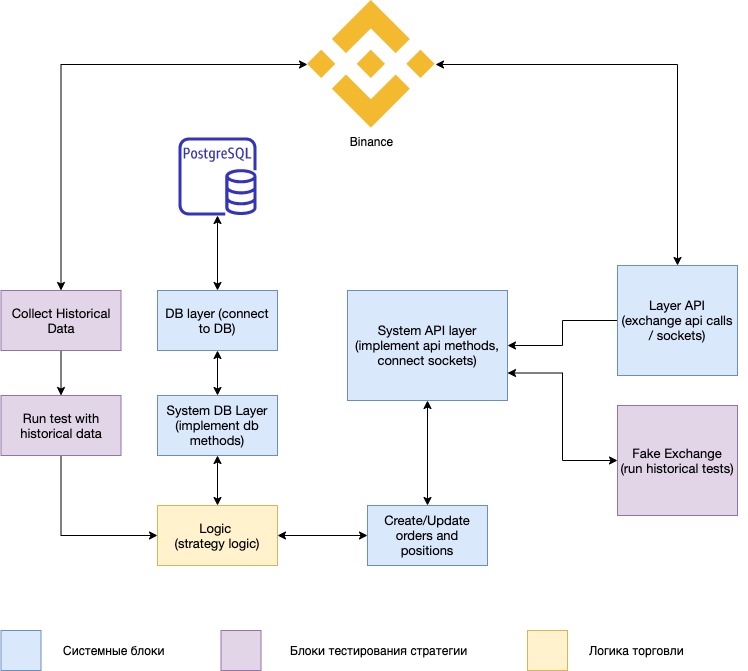
Базу выбрал PostgreSQL. Тут нет никакого тайного умысла. Вы можете использовать любую.
В связи с тем, что каждый модуль стоит внимания, это все не поместится в одну статью. Поэтому я начинаю мини-сериал: «Пишем качественного трейд бота на JS». Поэтому подписывайтесь, устраивайтесь поудобней — начинаем
Сервис для логов
Простой класс, который принимает на вход префикс для логирования и имеет два метода log и error . Эти методы печатают лог с текущим временем и перфиксом:
Теперь подключим биржу
Добавим класс BaseApiService. Сделаем в нем инициализацию Binance SDK, а также применим сервис LoggerService. Учитывая мой опыт с Binance могу сразу сказать, что в зависимости от торговой пары мы должны слать цену и обьем с разным количеством знаков после запятой. Все эти настройки для каждой пары можно взять, сделав запрос futuresExchangeInfo() . И написать методы для получения количества знаков после запятой для цены getAssetPricePrecision и объема getAssetQuantityPrecision .
Дальше добавляем метод создания ордера, с учетом правильного количества знаков после запятой для цены и обьема:
Теперь бот умеет создавать ордера. Научим его слушать события из биржы для того, чтоб он мог отлавливать изменения статуса ордеров. Для этого создадим класс TradeService.
При помощи метода из SDK this.api.websockets.userFutureData подписываемся на события из биржы. Самой главный колбек для нас this.orderUpdateCallback . Он вызывается каждый раз когда меняется статус у ордера. Ловим это событие и прокидываем через EventEmitter тому, кто на это событие подписался, используя метод subscribe .
Перейдем к базе данных
Для чего она нужна? В базе будем хранить все ордера, а также всю историю торговли бота. Пользователей с их ключами к бирже и балансами. В последствии сможем считать сколько бот принес прибыли/убытка. Тут останавливаться долго не буду. Подключаю sequlize.
Добавим docker-compose.yml файл для локальной базы:
А также добавляю миграции и модели. User , Order
В следующей статье будем писать ядро, которое соединит все эти части и заставит бота торговать.