Как добавить сеть полкадот в метамаск
Modified on: Wed, 8 Mar, 2023 at 6:35 PM
Polkadot is its own network and is completely separate from Ethereum or any other chain. Wallets like MetaMask or MyCrypto only support the Ethereum network, and you cannot use them to store your DOT.
You can only store DOT in a Polkadot address on the Polkadot network. Polkadot addresses always start with 1 (Polkadot format) or 5 (generic Substrate format), as opposed to Ethereum or BSC addresses, which start with 0x . You can find some wallets that support Polkadot in this article.
There might be a Polkadot integration for MetaMask in the future, however, at the time of writing, we are not aware of any working solution yet.
If you mistakenly withdrew DOT to MetaMask from an exchange like Binance, you sent a «wrapped» token rather than the native DOT token. You can find more information on this in this article.


Please let us know below if you found this article helpful or click on the «Contact Us» button if you need further assistance.
How to add Polkadot (DOT) to MetaMask in 3 steps
Maybe you own some Polkadot (DOT) that you want to transfer and you are looking for a way to add the DOT network and Polkadot to your MetaMask wallet.
But there is a little catch. It is fairly easily possible to add custom tokens to MetaMask. But MetaMask is an Ethereum network-based wallet, thus it can only hold tokens created on the Ethereum network. Which DOT is not. But there is a way to do it!
The only way to add DOT to your MetaMask is by adding Polkadot but on another network than the native one. Because Polkadot doesn’t only have to be sent through the DOT network, but also through the BNB network.
In this article, you will find a guide on how to add DOT to your MetaMask wallet using the BNB network. Let’s dive in!
Can you add Polkadot to MetaMask?
As was already mentioned in the introduction you are able to hold only the Binance-peg DOT token. Not the Polkadot in its native network.
That’s because MetaMask does not support the DOT network, but only the Ethereum network and Ethereum-based tokens.
And to put it the easy way, Binance Smart Chain is built with the same programing language and is quite similar to the Ethereum one, thus it can be added to MetaMask.
But don’t worry. Using the BNB chain instead DOT native network doesn’t mean any significant changes.
The only thing you have to watch out for is when sending Polkadot to or from your wallet you have to select the BNB chain, not the native one as the transaction network.
How to add Binance Smart Chain to MetaMask
First thing first you will obviously need to have the MetaMask extension installed.
That’s fairly easy to do. Just head to the MetaMask download page and download the extension. After that follow the instructions given on the screen.
But, if you need any help with the creation process of your wallet you can our guide on the basics of MetaMask wallet.
With your wallet ready, it is time to add the Binance Smart Chain to MetaMask.
BNB chain doesn’t come prepacked with your wallet, thus we need to do it manually. To do so open your MetaMask extension, click on your profile picture, and tap “Add network”.
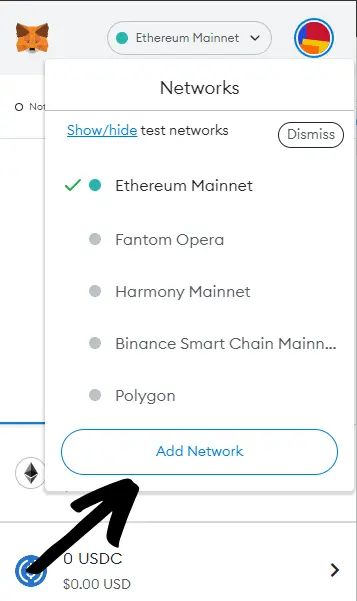
A new window will pop up where you need to fill in the network details. Fill in:
- Network Name: Smart Chain
- New RPC URL: https://bsc-dataseed.binance.org/
- ChainID: 56
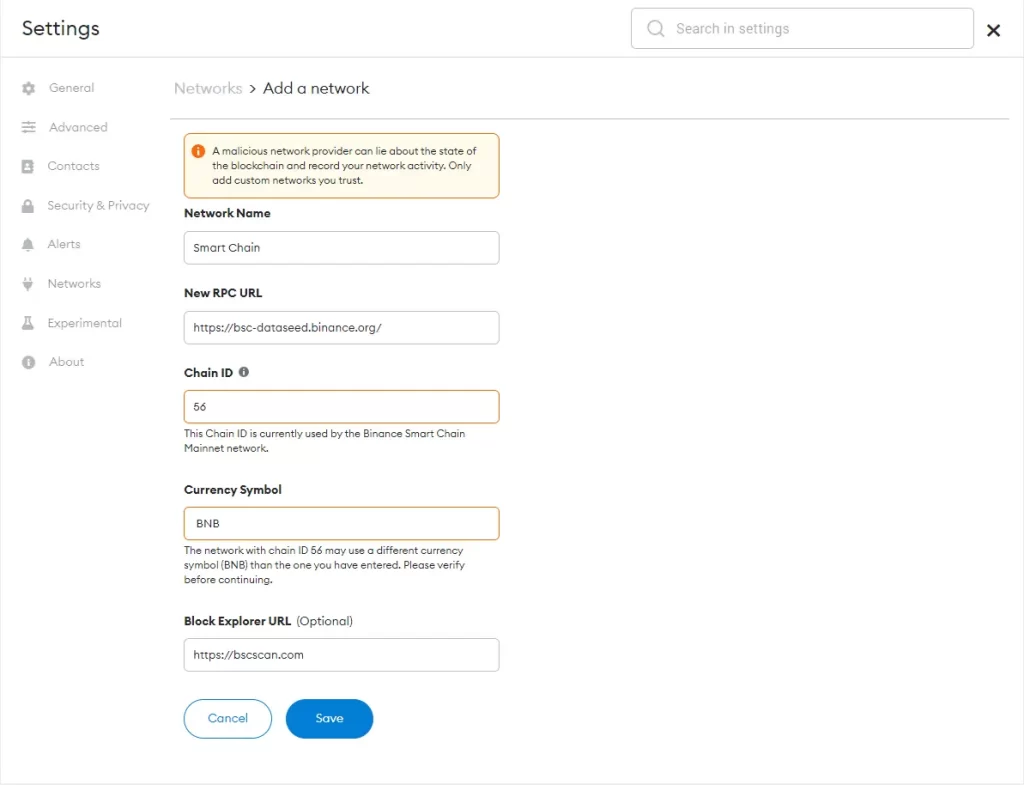
These details can be found in the official Binance guide, here.
After hitting Save BNB chain was successfully imported. Now what is left to do is to add Polkadot itself to MetaMask.
How to add Polkadot to MetaMask
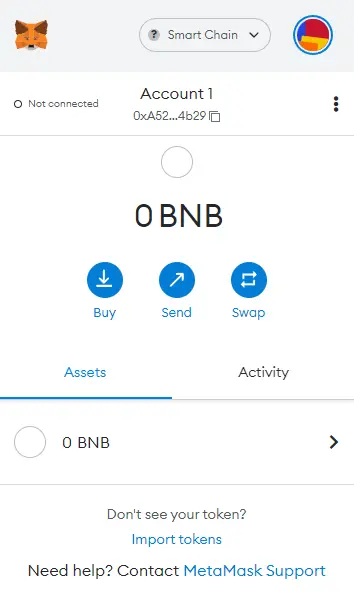
Now it is time to import Polkadot itself to our MetaMask wallet. First, please ensure you have the right network selected.
So keep in mind to select the BNB chain we imported a minute ago.
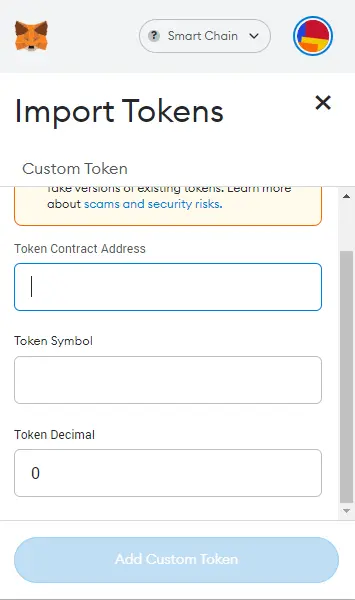
And hit “Import Tokens” at the bottom of the page. A little table will pop up asking for the Custom Token details.
Now head to the Polkadot page on CoinMarketCap.
Doing it through CoinMarketCap is one of the easiest and most reliable ways to obtain the contract address. It is really important to ensure that you are getting Token information from a credible source.
Find the section called “Contracts”.
Here you have either the possibility to copy the Contract address and paste it into MetaMask or to have the Polkadot imported to MetaMask automatically by clicking the little MetaMask logo.
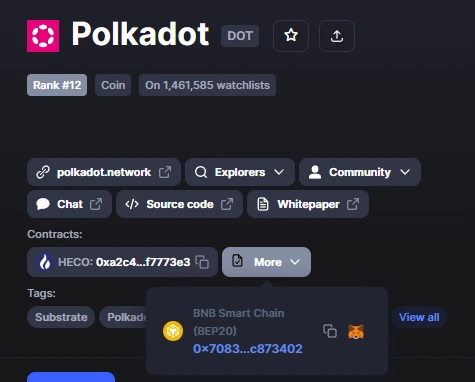
Because the BNB Chain isn’t the main character here, you will find the DOT on Binance Smart Chain under the “More” button.
Copy the Contract address and head back to MetaMask to paste it into the “Token Contract address” field.
All the other information should be automatically filled in. If DOT as the Token symbol did not automatically appear you may have copied something else than the Polkadot contract address.
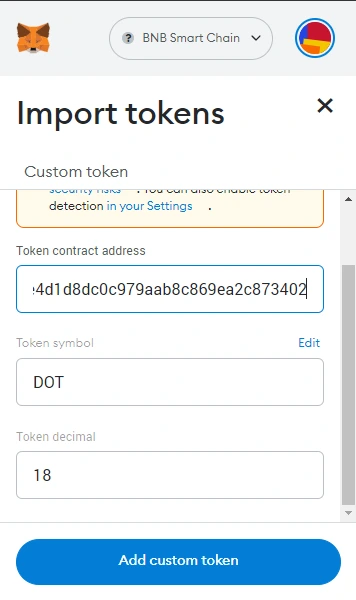
After selecting “Add Custom Token” you will need to confirm one last time the import of Polkadot.
If you have done everything right Polkadot will appear as one of your tokens in your MetaMask wallet.
This will allow you to see the DOT balance deposited via the Binance Smart Chain. Now you can grab your MetaMask wallet address and send yourself some DOT.
The withdrawal process to MetaMask usually takes a maximum of 30 to 60 minutes. But as Binance Smart Chain verifies a transaction every 3 seconds, your Polkadot will probably land in your wallet in a minute or so.
Conclusion
Adding Polkadot to MetaMask is nothing hard.
All you need is to have 2 minutes of your time.
First, add the BNB chain. Then import DOT as a custom token using the contract address you can find on CoinMarketCap.
Now you will be able to send and receive DOT on the Binance Smart Chain. And that’s even though the DOT network itself cannot be added to MetaMask.
Как добавить сеть полкадот в метамаск

Пошаговая инструкция как получить 1000 монет WAN и конвертировать их в 200 USDT на Binance
MetaMask работает с криптовалютами, основанными на EVM (Ethereum Virtual Machine), и поэтому не совместим с блокчейном Polkadot, который не использует EVM. Это означает, что сеть Polkadot невозможно добавить в MetaMask.
Для работы с блокчейнами, не основанными на EVM, понадобится другой кошелек. Если вы хотите взаимодействовать с сетью Polkadot через кошелек аналогичный MetaMask, рассмотрите следующие популярные альтернативы:
How to Send Polkadot (DOT) to Metamask on Moonbeam Network
![]()
This guide will take you through depositing XC-20 assets to Moonbeam. Here’s a primer on XC-20. In this tutorial Polkadot (DOT) will be used. Before you proceed, you will need the following items ready:
- DOT balance on your wallet
- 2. MetaMask Wallet
- 3. Polkadot.js wallet extension
If you don’t have any of the mentioned items or you have your Polkadot balance on a centralized exchange like Binance, then click this guide to get you ready.
Step 1: Open Moonbeam Dashboard
Head to Moonbeam Dashboard by clicking here, or visiting https://apps.moonbeam.network/moonbeam
Step 2: Deposit DOT
Find Polkadot in Cross Chain Assets panel and click on deposit . A prompt to Connect Polkadot.js will come up, click on Connect.
Step 3: Allow Application Access
Polkadot.js pop-up will come up. Click on Yes, allow this application access.
Step 4: Deposit to Moonbeam from Polkadot
On the next window, set origin chain to Polkadot , and choose your address from drop down menu. Next enter your desired amount and click send.
Step 5: Sign Transaction
Click Sign the transaction when it comes up. Once done your assets should arrive in less than a minute.
Step 6: Add Token Address to MetaMask
Moonbeam dashboard will show token balance once assets arrive. To see your assets in MetaMask wallet click on add to MetaMask .
Step 7: Confirm Adding Token
Click on Add Token to confirm when MetaMask notification comes up.
Success!
You have successfully sent XC-20 asset to Moonbeam, you can now see your asset on Metamask and pool, farm, send or withdraw xcDOT as you would any other erc-20 asset.
About StellaSwap
StellaSwap is the first and leading Moonbeam DEX that offers an integrated gateway to the DeFi world. Users can swap, earn, yield farm, bridge assets, explore new projects and engage in NFT trading all from a single unified platform. StellaSwap’s products are structured in such a way that facilitates decentralized governance of STELLA holders, while continuing to innovate on the collective foundations by design.